Mountain Smith

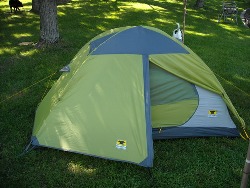
Mountainsmith Morrison 2 Person Tent

This two person tent maintains quality standards while appealing to those looking for a budget camping tent.

Click here for price, and find out about free shipping.

The name Mountainsmith tents might have triggered a memory for readers of magazines devoted to the outdoors.

They were awarded the 2011/2012 Backpacker Magazine Gear Guide “Killer Deal!” and 2011 Outside Magazine “Killer Value!” awards.

We have to agree that, for its kindness to the wallet,  this product  rates highly in the 2 person tent category.

This tent has a generous floor space and can accomodate two average size people comfortably.

It’s  length leaves good leg room for those in the six foot plus range in height.

So saying, we still believe the standard two man tent layout best suits one individual, if you want to keep your backpack inside.

mountain smith

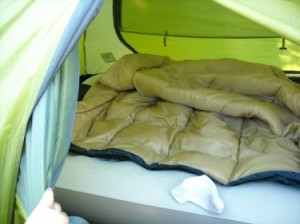
Comfy for one, snug for two

The best rating would be: comfortable for one, snug for two.

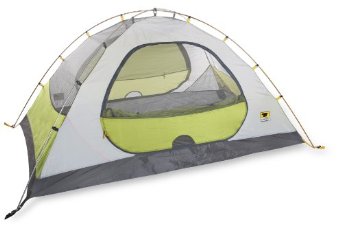
But what helps greatly in a two person situation is the two doors and two vestibule set up.

No more elbows in the ribs or a knee to the chin when the one with the weaker bladder needs to exit in a hurry.

A solo camper will have plenty of access, even with a bit of extra gear stowed inside, and protected from the elements.

You never know what might crawl into your boots or backpack if left outside.

The Mountain Smith people make every effort to cater to the storage situation with the inclusion of ample mesh pockets for your sundry items, like wallet, watch flashlight etc.

There is also a removable gear loft. Although some campers suggest it hangs a little too low and stops you from sitting up conveniently. It’s easily detached and left at home if it becomes a bother.


The Mountainsmith Morrisson boasts plenty of features for a tent in the budget range.


Features include:

  • A 2-door/2-vestibule configuration.
  • Workable genuine two person layout.
  • Rated a three season tent.
  • Tent fly with ventilation windows.
  • Bathtub floor design.
  • Taped floor seams.
  • Mesh wall panels.
  • Detachable ceiling loft storage.
  • Interior mesh storage pockets.
  • Clip-pole attachment for lighter weight.
  • Reflective guy lines with tension lock cord adjustment.
  • Quality YKK® Zippers.
  • Set-up instructions are printed on the stuffsack.

Generous dimensions:

92″ x 56″ x 43″ i.e (234cm x 143cm x 110cm).

18″ x 7,5″ i.e. (46cm x 19cm).

Floor area:

35 ft² i.e. (3.25 m²).

Vestibule area:

17 ft² i.e. (1.6m²).

Peak height:

43″ i.e. (110 cm).

Trail weight:

4 lbs 11 oz. i.e. (2.3 kgs).

Packed weight:

5 lbs 8 oz. i.e. (2.5 Kgs).


An accessory we recommend is the tough water resistant foot print, which can be purchased separately.

We realize the whole idea of a trail tent is to keep the weight down, but this thing weighs just 9 ozs or .25 grams.

It would add to your comfort and prolong the life of your new tent.

An economical option would be to buy a cheap nylon tarp to put under the floor when setting up camp.

Just remember to tuck the edges in under the tarp so that the edges do not stick out from the sides of the tent.

This will stop water pooling underneath.


Some argue that the Morrison is a little heavier than other dedicated 2 person backpacking tents.

But this comparison is made unfairly with hiking tents in a much higher price bracket.

For a newbie to trail tents, or those on a budget, it is very easy to recommend the Mountainsmith Morrison 2-person 3-season tent.

It’s a great entry level product and for the casual camper there would be no need to look further.

The weight should be no issue to the average fit person. If it is a concern, split the weight between two.

You could always same an ounce or two by removing the fabric which can be zipped over the mesh section of the doors. Or detach, and leave behind, the ceiling storage loft.

Just keep in mind before discarding the extra door fabric, that it is a feature designed to help regulate temperature and adds to your comfort.

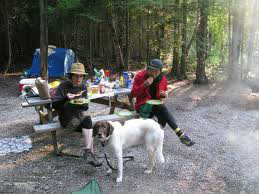
The Morrison is ideal for the car if you are constantly pulling up stakes and moving on.

The same goes for those who favor motorcycles or bicycles, and need there accomodation to fit the panniers on your bike.

A benefit for the two-wheeled brigade, is that the poles break down into an easily stored 18 inches.


We reckon you can hit the trail with confidence in this three-season hiking tent.

A feature of the Mountainsmith Morrison is that it is sturdy enough to be used in all

Mountainsmith Morrison 2 person tent

Confidence on the trail

but the harshest winter conditions.

The tent fly ventilation windows and bathtub floor design make it suitable for camping in warmer, arid situations.

The two door set-up and ample mesh makes sure you get the right airflow to disperse the hot air.

It handles windy conditions, as well as rain. All you need think about is to use all the lines and velcro that is supplied.

The poles and stakes are made of sturdy aluminium, not fiber glass.


Don’t just take our recommendation, click here to read what others have to say.

The Mountainsmith Morrison is a very easy to set up tent

Ease of set up has to rank as a prime feature of this budget 2-person tent. One would need only a few minutes to have it erected.

The instructions are printed on the stuffsack, so are pretty hard to misplace. But even though it is easy to set up and take down, we would recommend you put it up in the comfort of home before taking to the trails.

You wont find it difficult, but you’ll gain confidence for when you’re on the trail.

  • Components feature color-coding, so all you need do is match them up.
  • There are only two poles. One is silver, the other anodized gold, and they click into place with little effort.
  • The aluminium poles are tough and lightweight, so wont damage easily.
  • Follow the corresponding colors on the relevant clips, and simply slide the poles through.
  • Then stake out the corners of your tent and insert the poles into the grommets by matching the colors.
  • Keep matching the colors, and attach the tent clips to the poles.
  • Now its time to attach the fly to the tent . It’s simple, because the webbing attachments on the corner of the fly corresponds with the webbing on the tent itself.
  • Now you are ready to peg out the front and rear guys to create the vestibules.
  • Finally, peg out the remaining guy lines, and simply adjust by using the handy tension locks.
  • Vents on either side of the fly can be adjusted to reduce or increase airflow to keep you cool or reduce condensation.
  • You will find the whole process pretty intuitive, even if you are a complete beginner to camping.


It really is hard to find many negatives with the Morrison 2 person tent, especially at the price.

As befits a hiking tent, the tent stakes are small and lightweight.

The stakes have a “v” shape and well designed to secure guy lines or tie down straps.

Zippers can be a weak point, especially in budget tents, but thankfully Mr. Mountain Smith has opted to use quality Japanese made YKK® zippers.

Reflective guy lines are a bonus if you need to set up, or move around at night.

Morrison 2 man tents

Easy to set up

The tension lock cord adjustment helps keep things trim, taught and terrific.

Probably the main gripe is that the vestibules could have been a bit more roomy.


Mountainsmith have a good reputation for being responsive to the needs of their customers

and are a dedicated outdoors specialist, with an inspiring blog at www.mountainsmith.com/blog/


For ease of set up and value for money, we think Mr. Mountain Smith has done a great job with the Morrison  two person 3 season tent.


For the current Mountainsmith Morrison 2 person tent price, and free shipping, details click here.


Camping With Dogs

camping with dogs

Happy Campers

Camping With Dogs Can Be Rewarding.

But a lack of preparation could turn it into a disastrous experience for man and beast.

Dogs are great company around the home and need not be left out every time you take the camping tent out of storage.

Camping by yourself, even in the most beautiful location, can be a lonely pursuit. A canine companion would be more than eager to share the adventure and be less intrusive on your solitude than many humans.

If you’re tent camping with the kids, dogs often double as a child minder, eager to play while the weary adult relaxes around the campsite.

A well-trained canine companion makes it easy for your group to befriend other dog lovers who will invariably want to pat your dog and ask about its breed.

A small well behaved family pet dog will help to calm nervy. This could be a big bonus when camping with toddlers.


Taking A Dog Camping Requires Thought And Preparation


It always pays to be prepared when taking a dog away from home. And that includes  taking responsibility.

Being able to physically control your dog with a leash, as well as with voice and gestures, is absolutely crucial.

Don’t kid yourself that Fido’s behaviour when camping will not change from when he is home in the backyard.

The dog will be excited by the change in routine and distracted by new sights and sounds.

Nature will provide many diversions in the form of new types of creatures to chase or the pets of fellow campers to sniff out.

Get to know your pet’s character, and remember there are plenty of children, and adults too, who are afraid of dogs.

Your lovable, playful hound in your eyes can do no wrong. But to others, even the most docile animal will seem like a snarling Cujo.

Be honest in your assessment  and be aware of what raises its hackles.

Know what triggers various responses like a threatening growl, a bout of annoying whimpering or barking.

Is it playful or aggro around other dogs? Does it relate well to children or strangers in general?

Some dogs, whether it be their aggressive personality or breed traits, just aren’t suitable for camping. Leave them home.


Be Confident About Going Camping With Your Dog


Just follow these basic precautions:

  • Ensure your dog is registered and always carries the appropriate tags.
  • All dogs should be micro chipped and make sure the information contained is up to date.
  • See your vet before you leave home for a doggy health check and to ensure it has all the necessary vaccinations.
  • Ideally have your dog enrolled in an obedience class. Having a well behaved and mannered dog will make it a much more pleasant experience all round.
  • Dog training classes are often free, or for a minimal fee. Check with your local town hall or civil authorities.
  • These days, there are also online training programs which are well worth the investment in your long term peace of mind.
  • Don’t forget, this training is not just to make you happy. A dog’s brain is wired to please us humans, and it appreciates knowing how to respond properly to commands (don’t forget to praise).
  • Canines are creatures of habit and can become anxious when their normal order of things changes.
  • Just as going camping with young children, a little familiarisation program is helpful.
  • try to schedule some day trips away with your dog, at least a few weeks before going camping.
  • Take along some of your pet’s camping equipment, such as bedding and food and water bowls.
  • I found that kids like play camping, with a tent set up at home, and dogs will respond well to this too.


Camping With Dogs Requires Some Basic Equipment


RESTRAINTS:

Ensure you have leash in good condition as well as a strong collar. Preferably, take a couple of leashes. You could take a strong cord leash for maximum restraint if you are near other dogs, and your animal is likely to lunge.

A lightweight retractable leash will allow for more freedom if there are less distractions for the dog.

Consider a longer tether, suitable for securing the dog to a tree or other suitable structure.

This will come in handy at night while sitting around a campfire. It’s also practical if you are just hanging out at the campsite and wish to give the dog some freedom, while maintaining control of its movements.

Even if your dog is the most benign of creatures, having a lightweight muzzle on hand could prove wise. Even a placid dog will bite if in pain and you are attempting first aid.

My friends own Lilly, a friendly border collie who plays happily with familiar canine friends.

But take her for a walk on the beach and encounter strange dogs, she will lunge at them.

A muzzle comes in handy for the “Jekyll and Hyde” hound that catches owners by surprise.

DOG BEDS:

A basic air mattress with a blanket is good. Ideal would be some familiar bedding from home.

The old bedding will take a lot of stress out of being in a new environment. Make sure that there is a buffer underneath it to protect your pooch from the cold seeping up from the ground.

If your dog has its bedding outside, put a waterproof barrier underneath.


FOOD & WATER:

Check with camping ground supervisors or rangers if local water in rivers, streams and lakes is free of contamination, whether bacterial or chemical. Clean drinking water is essential for humans and dogs alike.

If there is no potable water available, take suitably large containers from home. These can be refilled with drinkable water from a source within reasonable driving distance from your campsite, if staying for an extended period.

Don’t drop your guard and let the cooler season suggest you can get by on only the barest minimum of water. Things change.

The same applies to dog food. Always take more than for your planned time away.

As with your own food, do not store edibles in the tent. Use a bear box if available, or store the grub in your vehicle.

Bears might not be a problem in your neck of the woods, but there are plenty of other creatures snooping around at night for a free feed.


EXTRA TOWEL:

Be prepared for your dog to roll in something unpleasant and then need a quick sluice down or a plunge into a river.

Once the excessive water is shaken off, there is still enough moisture on the fur to dampen bedding or your sleeping bag. You wont regret bringing that extra towel.

The practical equipment needed is pretty basic but be prepared to make a decision about your dog’s suitability for camping. Leave emotion out of the equation.


POOCH PACK:

As well as your own backpack, take a pack for your hound, too.

It could contain necessities, like food portions stored in plastic baggies or an airtight container, food and water bowls, a canine first aid kit, basic grooming tools, poop bags, an extra leash and collar with identification tags, and bedding.

Dogs love to do their bit, so if it’s a suitable breed, let it carrying at least some of the supplies.

Do some training with the canine pack before setting off camping and hiking with your dog.

The pack could include extras, like a blinking LED collar, booties, a high-visibility jacket and a life vest for safety if camping near a lake or river.

Remember to bring a favourite toy, like a Frisbee or ball for retrieving.

Something familiar will help the dog feel more comfortable wherever you’re camping.


A TENT SUITABLE FOR DOGS:

If, like me, you prefer your dog inside the tent with the family, the correct configuration of tent helps.

A camping tent with separate compartments fits the bill. Click here and read why I recommend the Big Agnes Flying Diamond tent as one of my favorites. A great alternative is the Coleman Red Canyon.

If you are new to camping, with, or without dogs, click here for some helpful tips.


Some Breeds And Personalities Do Not Make For Good Camping Dogs.


Taking a dog camping

Just one of the guys

An aggressive dog, no matter how sweet indoors at home, is the first to cross off the camping list. it’s just trouble waiting to happen.

I live in a small country town in Australia, and some of my friends have Jack Russell terriers. They are terrific, hardy companion animals but many don’t respond well to training .

My friend’s Jack Russell, Cookie, has lept from a moving car on spotting some passing animal.

She has jumped off the side of a boat trying to get a fish before it was landed.

In the bush she would disappear into the scrub and return when she felt ready for it.

 I don’t want list a whole lot of breeds here and antagonise their fanciers. There are exceptions in all breeds.

I have had a series of beautiful, feisty Australian Silky Terriers over the years, but never would take one camping.

Persistent barkers of any breed should not go camping. Breeds consistently fitting this category, include my beloved silkies. Others are Yorkshire and Maltese terriers, Pekingese and Shih Tzus.

Barking is bad enough in the suburbs, but the sound travels long distances in the countryside.

At a busy campsite, new friends could soon become enemies if you bring along a barker.

It is possible to train a dog not to bark, but that’s best left to a professional.

A determined wanderer can make life difficult in a large camping ground.

It will prowl neighbouring campsites in full scavenger mode. Leave them home if you are not prepared to have them constantly tethered.

A bitch in heat would not be advisable as a good dog for camping. Nature being what it is, you will find your campsite the target of unwanted attention.

The most suitable dog breeds for camping are in the working dog category. They included German Shepherds, Border Collies, Australian Cattle Dogs, Hungarian Vizsla.

Also Spaniels and other retrievers, like the Golden and Labrador retrievers.

The list could get pretty long, and apart from the pure breeds already listed, don’t forget the mixed breeds and pound dogs. All could make excellent camping dogs.

Dogs make great camping buddies, but some breeds, such as snub-nosed pugs and bulldogs, will need extra attention.

Most dogs relish the outdoors, but there are things to consider.

Remember, a dog with a shorter snout is not as well-equipped to cool itself, so could on occasion experience some trouble breathing and panting.


It’s Your Call If You Take Your Dog Camping, Just Take The Responsibility…

…and be considerate of fellow campers

  • Remember, not everyone responds well to a friendly but overly exuberant dog jumping up on them.
  • No matter how cute your canine is, it will not always be greeted warmly when it wanders over to the strangers in the neighbouring tent.
  • Don’t let your dog bound up and down hiking trails if there is a lot of foot traffic. Let them loose when things are quiet.
  • Reassure hikers who feel threatened that you have your animal under control.
  • Be prepared to back off or change directions if approached by a strange dog whose owner has failed to adequately restrain it.
  • Take the time to clean up after your hound has done its business. When a dog has to, it has to go. But there is no excuse for you to ignore a steaming pile of dog excrement. Bury it, even if you are hiking off a recognised trail.
  • Commonsense rules.


Know where to camp with your dogs


Avoid disappointment by checking if your desired camping spot allows for dogs camping.

Many state parks will permit it, others may not.

Some supervised camping sites allow dogs, others don’t. Even ones that do, will have regulations you must adhere to.

Dogs might be allowed in camping grounds within national parks, national monuments and national forests, but be excluded from trails within them. Be prepared.

At least these days you have the luxury of the internet to check up on sites and determine if you can go camping with dogs.


Thank you to HerePup.com for this great checklist graphic.

Ultimate Guide to Traveling with Your Dog


Camping And Hiking With Your Dog Is Great For Bonding

Former cheerleader, Anne Waterbury found a unique way of bonding with her dog, Jude.

She and her Alaskan Malamute, Labrador cross successfully hiked the length of the 567-mile Colorado trail.

They came home all the better for the experience.

You learn a lot about life with your dog when the two of you hike the Colorado Trail together.

Read her story below:


“My dog Jude is a wonderful companion,” said Anne Waterbury, a Niwot High School graduate and former school cheerleader.

“He has a true trail mentality. He would run ahead, and then wait for me as if he was saying ‘Come on, let’s go!’

I think he probably ran double the miles that I hiked, because he was always running ahead and coming back for me.”

Waterbury hiked the full 567-mile Colorado Trial for six weeks, starting July 5 and ending August 15.

While the trail may be slightly easier for a four-pawed Alaskan Malamute/Labrador mix, it’s no secret that tackling the Colorado Trail is daunting.

The trail runs from Waterton Canyon south of Denver to Durango, and a through hike generally takes four to six weeks to complete.

According to the Colorado Trail Foundation, trail users will pass through six wilderness areas and cross eight mountain ranges, with the highest elevation topping out at 13,271 feet.

The average elevation is over 10,000 feet, and the trail rises and falls dramatically. Users who hike from Denver to Durango will climb a total of 89,354 feet.

Travel is recommended between late June and late September, because of snowpack issues, and a finish before “snow becomes plentiful” in late September is cautioned by the foundation.

And in those few summer months, hikers have to look out for lightning and hail and insects.

“I got bitten several times by horseflies. I hate those things,” Waterbury said. “The trail was pretty buggy at times.

But I was really lucky with the weather. Even though it rained pretty often, I was below the tree line when the bad storms occurred.”

PREPARING TO GO

Waterbury works in the paediatric intensive care unit at Rocky Mountain Hospital for Children at Presbyterian /St. Luke’s in Denver.

It’s a very flexible job, which provides a lot of time and freedom to lead the active lifestyle Waterbury prefers

. She had completed short backpack trips—nothing longer than three days—and had even hiked small segments of the Colorado Trail before this odyssey. Still, this was a big undertaking for her.

“I decided in January that I should do something more challenging this summer,” Waterbury said. “It seems like summers disappear so fast. I wanted this to be a memorable summer.”

Read the full article, Written by Kim Glasscock


You don’t need to go to the extremes that Anne did, but I think you’ll find her adventure inspiring.

I guess the breed of her canine companion, Jude made it more practical than if she had been accompanied by one of the toy breeds.


Big Agnes Flying Diamond Tent

Big Agnes Tents live up to their reputation for roomy design and 4 season comfort.

All our tent reviews highlight easy set up, and the Big Agnes Flying Diamond 8-person tent, featured here, fits the bill.

This easy to set up tent is made even simpler to erect because of the color-coded poles.

They easily push through guides that are clearly described on printed instructions which are securely attached to the carry bag, so can’t be misplaced.

It is designed for year round use. You will stay warm and dry in the snow, although sub-arctic conditions might be a test.

The dome configuration means there is not as much headroom overall, as found in a straight-walled cabin tent. But there is still ample clearance, grading to six feet in the centre.

Technical specifications:

Tent material: The fly is made of polyurethane coated ripstop polyester. The body is polyester ripstop with polyester mesh. The floor is PU-coated polyester.

Capacity: 8-person.

Big Agnes Flying Diamond 8 Tent

Big Agnes Flying Diamond 8 Tent

Type: Double wall free-standing 4-season dome tent.

Poles: Six DAC Pressfit Reverse Combi aluminium poles.

Pole attachment: Clips and sleeves.

Doors: Two entrances.

Vestibules: Two, measuring 35 square feet.

Panels: meshed ceiling and side panels.

Seams: Fully taped.

Gear Loft: Available, sold separately.

Interior Height: 72 ins.

Floor Dimensions: 175 ins in length, 115 ins at widest point.

Floor space: 112 square feet.

Packed Size: 8 x 16 x 27 ins.

Packed Weight: 27 pounds, 12 ounces.

Trail Weight: 22 pounds, 6 ounces.

How the technical details translate into benefits for you.

  • The size and configuration make the Big Agnes tent ideal for the family camper. It is designed for year round use, and the rear compartment, with a separate entrance, is great for the kids.
  • The ripstop polyester material is able to withstand the rigours of family camping.
  • What is ripstop? It’s a lightweight woven material which resists tearing and ripping. The same technique is used in the manufacture of parachutes, sails, even hot air balloons. Anywhere a material is required not to fail under stress (just like family camping).
  • The huge polyurethane coated rain fly provides a secure roof over your heads. The PU coated floor is an added insurance against unwanted moisture. It is a very effective, breathable water barrier.
  • Colour coded tent poles make for an easy to set up tent. We advise that two people handle the setting up. Allow about 15 minutes.
  • The tent poles are a key component in this tent’s lightweight sturdiness. They are manufactured by the Donagh Aluminium Corporation (DAC) in South Korea.
  • Aluminium poles have a high strength to weight ratio. The Pressfit description refers to the ground-breaking pole jointing technology which increases durability, while keeping weight down.
  • Easy to follow instructions allow you to fit the poles into clearly indicated clips and sleeves.
  • Superb ventilation adds to the comfort factor. This is achieved through mesh ceiling and side panels.
  • Front and back vestibules keep the entrances protected and provide added shelter from the elements, whether sun or rain.
  • Two doors mean extra convenient access.
  • Convenient storage pockets cleverly placed within.


I have omitted cost details because places like Amazon constantly review their prices. They are always attempting to offer you the best deal. Just click on the Amazon button to get the current low price.

Big Agnes tents

Don’t forget to check out their free delivery and returns policy.

 In a nutshell: why do we like this Big Agnes tent? It’s the simple things

Big Agnes gear loft

gear loft accessory

It’s roomy and versatile. It can be used as your base camp when hiking or climbing.

Has the space for setting up an eating room in bad weather. Although generally we would not recommend having food in the tent. Never know what critters are prowling around at night.

Place a tarp under the spacious vestibules and you can keep your entrances clean and dry. The vestibules are a great feature because they can be completely closed, rolled away, or set up for shade.

It’s an easy to set up tent in the dome configuration, but still has room to move.

It can handle sudden changes in weather, such as wind, rain and snow.

Plenty of mesh storage pockets, some located at head height, for those bits and pieces that can otherwise become clutter.

Reflective guy ties help against stumbling in the dark.

The closed off section at the rear. Kids love it, so do  dog campers.

Easy to follow instructions come attached to the carry bag.

The carry bag is roomy and make this tent a lot easier to fold and pack than some.

One minor gripe: Some campers have found that the zips were not as sturdy as they expected for a tent this size. Counter this by using best practice and don’t neglect maintenance and cleaning.

To see what others have to say, just click here and read some detailed customer reviews.

Big Agnes Tents pass the test of most tent reviews when it comes to good design and durability.

But take our tip to prolong the life of your tent. Spend a little extra for, at least, a cheap poly tarp to place under the floor when setting up. This goes a long way to delay wearing of the floor, and guards against damage from rocky ground or exposed tree roots.

This tent has available dedicated floor protection, called a footprint, which can be bought separately.

A nice feature of the tent is the “spare back room” which has just enough space to squeeze in a queen-size air mattress.

The compartment can be folded back when not needed, to reduce the area of the floor plan. This is a handy feature of this Big Agnes 4 season tent, if the spot for pitching the tent is on the small side.


Maintaining Canvas Tent Fabric

kodiak canvas tents

Kodiak canvas tents at Scouts Of America jamboree

Canvas tents are a great choice if you want a rugged and durable product.

Canvas tent fabric has a number of unique advantages over polyester.

Its hard-wearing properties, and serviceabilty as a 4 season tent, are the reasons many buyers choose canvas fabric over polyester.

Modern canvas material also has other benefits:

  • Because they are heavier and have more substance, canvas tents are better suited for extended camping trips.
  • They are able to be manufactured in a cabin tent style, which allows for sturdy straight walls. There is more room to move about inside.
  • These tents generally have more head room, so no need to continually stoop.
  • Canvas fabric is better able to cope with rough winter weather.
  • They are a 4 season tent well suited also to summer camping because canvas breathes better than polyester.
  • If you choose canvas, it will be many years/decades before you need to think of a replacement.


The two standout disadvantages of canvas are its higher price and extra weight, which makes it a little more difficult to transport.

Even though they are heavier than polyester tents, they are not as weighty as the canvas tents of the past.

It is also more bulky, so does not pack down as conveniently as polyester/nylon tents.


What are the properties of canvas fabric that make it so suitable for camping tents?

  • Cotton is essentially the backbone of canvas, and has been for generations.
  • In fact, for seniors like me, it is a memory of early family camping trips with heavyweight, unwieldy canvas tents, that have made us avoid getting involved with canvas again.
  • But these days, top grade canvas is often made of polyester/cotton blend.
  • This utilizes the good attributes of both these materials and reduces the negatives.
  • The cotton-based material gives it superior ability to breathe and the facility to seal really well and be water tight.
  • Cotton by itself is not as strong compared to the various forms of polyester fabric in the same gauge. That’s the reason the old style canvas tent fabric had to be woven so heavily.
  • Polyester by itself has superior strength to weight ratio, which results in stronger, lighter tents.
  • But polyester alone does not breathe nearly as well as canvas, which leads to issues with condensation and poor temperature control.
  • Unlike canvas, polyester will not contract around the stitching points, which then become prone to leaking.


Why you need to take steps to prepare your new canvas tent before its first camping trip?

Even the best canvas fabric is not water proof to its full potential. Although near impossible to see with the naked eye, the holes left by the sewing needle are slightly larger than the thread passing throught it.

This leaves a point vulnerable to leaking. But the poly/cotton thread used to join the cotton, or poly/cotton blend canvas fabric, has the properties for self-sealing.

If you follow the recommendations, the thread will expand and the canvas shrink to make the sewing holes impervious to water.

These tents, for the most part, do not need special treatment after purchase. But you are advised to follow a few basic steps to ensure you stay dry while camping.

We suggest that you check first with the manufacturer whether or not your tent has been waterproofed.


This is how to weatherproof your new canvas camping tent.

  • Your tent needs to be “weathered”, and this is achieved by repeating a wetting and drying process.
  • Pitch the tent, then spray it with water from a hose and let it dry. Repeat this a few times.
  • You could do this by leaving the tent out in the rain a number of times. The hose is more convenient, but make sure you set the nozzle to a gentle spray.
  • By doing this, the poly/cotton thread stitching will expand, while the canvas fabric shrinks up to around four per cent.
  • If you have the opportunity to set up at home during constant rain, this might be more beneficial in soaking areas of the tent fabric which have multi layers. This includes spots like reinforced corners or where edges are folded over.
  • Don’t panic if there is some dripping from the joins. These areas will leak until the canvas fabric has a chance to dry off.
  • If your tent is used primarily in hot and dry weather over a number of years, and not been subject to any wetting in this period, this weathering process will have to be repeated.


It might take a decade of constant use, but the tent will eventually need re-waterproofing.

Look for the signs that tell you whether you need to take steps to make your tent more waterproof.

This will be apparent when water starts leaking through the canvas fabric itself, not just the seams.

You will most likely notice wet spots staying after the rain has ceased.

The canvas will give you a sort of dry and dusty feel to the touch.


Pays to buy a quality water proofing agent.

This is usually in the form of a water-based sealant, and is available in cans from camping stores.

The sealant is painted on and dries to a clear finish.

Make sure the sealant is of a thin consistency so that when you paint it on, it will soak right in.

Use the recommended thinner, if required.

Don’t paint on if if it feels like you are applying a thick surface paint.

Before you begin the reproofing process, make sure you have a clean surface and treat any mold.

Otherwise the reproofing will lock in the dirt and mold.


Do regular basic maintenance of your canvas tent fabric and get decades of reliability.

Follow these canvas care tips:

  • Ideally, begin by cleaning your tent at the campsite before packing it up.

    Kodiak canvas tents

    Ground view of Kodiak canvas tents

  • Use a soft brush or broom to remove, dust, dirt and minor stains. Don’t get too rough with the canvas.
  • Hose down the tent with cold water, if possible.
  • For bird droppings and other stubborn to remove material, use very hot water. This will slacken the weave in the canvas tent.
  • Use an old toothbrush for bird droppings, but remember not to scrub too hard.
  • Never resort to detergents, soaps or bleach. This will almost certainly affect the waterproofing and coloring of the tent.
  • Don’t use high pressure spray devices. They can leave an unwelcome trail in the canvas as the waterproofing and color are scoured away.
  • Whenever possible, ensure your tent is dry before packing up at the campsite.
  • If you must pack up a wet or just damp tent, ensure it is thoroughly aired and dried within the following 24 to 48 hours.
  • Once home, set up the tent, hang it up, or lay it out to dry. Set it up even if it is still raining, then pack it away once it has a chance to completely dry, after the rain has passed.
  • Never store wet canvas because this leads to mold growth.
  • At the first sign of mold or mildew, hose it and wipe it down before it gets a chance to grow into the fabric.
  • Never store canvas tents directly on concrete surfaces. This encourages mold and insect infestation, as well as having the potential for a harmful acidic effect.


Take care of the canvas tent fabric, but don’t forget the zippers.

Faulty zips can become a big headache. It could hinder entry and exit, also compromise tent ventilation. So include them in your general tent maintence.

If allowed to deteriorate too far, it could lead to costly repairs.

Keep zips clean and have them closed when putting up or dismantling your tent..

A good silicone spray is recommended to keep them lubricated

Avoid oil-based lubricants because they will attract dirt and grit, which will wear out the zipper a lot faster than normal.

Never force a zip, and never zip over wet or dried mud.

A warn slider will sometimes present itself by teeth not meeting up correctly.

A slider can be replaced. But if you are still at the campsite, try a little “first aid” by using a pair of pliers to squash the slider slightly (very slightly, mind).

Remember, this is a temporary fix only. Don’t leave the proper replacement too long.

Preferably, don’t let it get to this stage, because the canvas will need to be placed under a machine to restitch the unpicked area to install the new zip.


If you have have read right down to here, it might appear a big task to look after canvas. But all these steps are pretty basic. You just need to avoid putting off the job once you arrive home from your camping trip, and next time out have the reassurance you are unpacking a clean. water tight and durable canvas tent.

Canvas tents remain a top choice for family camping. Just click here for our review of the popular Kodiak Canvas Flex-Bow Tent, a 4 season tent.


Kodiak Canvas Flex-Bow Tent

The Kodiak Canvas Flex-Bow Tent, in the 8-person configuration, is ideal for the family camper if sturdy construction is a priority.

Question:  Why buy canvas cabin tents when nylon and polyester tents are lighter and cheaper?

Short answer: Durabilty.

Nylon and polyester tent materials have vastly expanded the options on offer in camping gear.

It has been a boon to hikers looking for lightweight shelter and tents that pack down small enough to stow in, or tie to a rucksack. Family campers benefit from the availability of large, lightweight  tents at comparatively low prices.

Canvas is heavier, and costs more, but has stood the test of time. With proper care, canvas tents will last you for decades.

These tents are better able to withstand harsh weather and also breathe better than polyester tents.

The tough construction make them more suitable for extended camping trips and are generally classed as four-season tents.

Although considered suitable for all-season camping, the Kodiak canvas tent is not designed for extreme winter, mountaineering or heavy snow accumulations.

Look at some of the unique features of the rugged, Kodiak Canvas Flex-Bow Deluxe, an easy up canvas cabin tent.

  • Manufactured from durable Hydra-shield™, 100% Cotton Duck Canvas. This makes it watertight and breathable.

    Kodiak Canvas Flex-Bow Deluxe 8-person tent

    Kodiak Canvas Flex-Bow Deluxe 8-person tent

  • Exceptionally tough Flex-Bow frame. This keeps the tent taut, and allows for quick and easy one-person set-up.
  • Spacious six and a half feet ceiling height. Walk around without having to stoop.
  • Convenient entry and exit through two D-shaped doors, front and back.
  • Strong zippers to secure the doors.
  • Four large, meshed windows.
  • A large 84 by 78-inch awning.
  • Customisable gear loft and organiser pockets.
  • Two funnel flow vents for improved airflow and temperature management.
  • Comes with heavy-duty 12-inch, steel rod stakes.
  • Convenient strap-and-cinch storage bag for easy roll-up.


I have omitted cost details because places like Amazon constantly review their prices. They are always attempting to offer you the best deal. Just click on the Kodiak canvas flex-bow tentAmazon button to get the current low price.

Don’t forget to check out their free delivery and returns policy.

All Kodiak Canvas cabin tents are manufactured with high quality, marine grade, 100% cotton duck canvas called Hydra-shield™ canvas.

That trademark term translates into custom woven and treated canvas, used in premium tent making.

It is actually double-fill, two threads twisted together for superior strength and lasting quality.

The very tight weave features a silicone, dry-finish treatment.

Do some simple maintenance after each camping trip, and you will have a rugged tent to last you for decades.

Get great canvas care advice at www.tentreviewshq.org/canvas-tents


How do all the technical features of this premium, 4 season tent benefit you?

  • The high standard canvas ensures you get a reliable shelter that is watertight, breathable and durable.
  • There is a greater resistance to mould and mildew.
  • You keep dry, even in a downpour, because this canvas tent does not leak or wick water.

    Kodiak Canvas Flex-Bow Tent

    Kodiak Canvas Flex-Bow Tent without the awning up

  • No need to be obsessive about touching the ceiling or walls during a rain storm.
  • Increased comfort levels because this canvas allows water vapour to escape, which minimises instances of condensation, humidity and mugginess.
  • You rarely have to re-treat this tent material, unlike canvas with paraffin or oil-based treatments.
  • The strong, durable construction means it will long remain a reliable buffer against the elements and outlast tents made with inferior fabrics.
  • Kodiak canvas tents feature a lifetime limited warranty.
  • Generous ceiling height makes it easy to move around.
  • Easy to keep tidy, with its customizable gear loft and organiser pockets.
  • No need to be a contortionist just to pull your pants on.
  • Simple to maintain fresh air flow and temperature management.
  • Plenty of light inside through the four large windows
  • Convenient entry and exit through the two large D-shaped doors.

 But don’t just take their word for it. Simply click here to read how others have experienced Kodiak canvas before making your buying decision.

 Specifications for the 10 x 14 ft, 8-person Flex-Bow Canvas Tent (Deluxe):

  • Pack weight: 79 lbs, which includes 6.5 lbs for the sturdy stakes.
  • Tent pack size:  30 inches long and 16 inches in diameter.
  • Poles pack: 48 inches long and 5.5 inches in diameter.
  • Ceiling material: 10 oz. Hydra-shield™ canvas.
  • Wall material: 8.5 oz. Hydra-shield™ canvas.
  • Floor material: 16 oz. vinyl, polyester reinforced, seamless.
  • Frame: 1-inch, galvenized steel tubing.
  • Flex-Bow rods: 3/8-inch, solid spring steel.


 Kodiak Canvas cabin tents remain easy to set up, despite their rugged construction and resultant extra weight.

Like anything you attempt for the first time, a little practice goes a long way.

But this tent is designed for easy assembly, and the whole procedure is basically a matter of staking it out and putting up three supports.

You will find things have improved a long way since the days of over complicated assembly requirements.

Kodiak Flex-Bow tents can be set up by one person in reasonable time. If you have someone to help, it should be up in minutes, not hours.

This tent is hard to fault, and a common thread in comments is its ease of set up.

Some people are better with their hands than others, but you don’t have to be a construction engineer to get this canvas tent set up.

Watch the easy tent set-up video below

Be aware of the difference between the deluxe and basic versions of the Kodiak Canvas Flex-Bow tents.

The deluxe model is the one with all the “bells and whistles”. The basic model is the same tent, less some of the features. The differences are outlined in the list below:

  • The basic models do not have the gear loft or clip on bag and pocket organizer.
  • There are no vents in the basic model to assist with improving airflow.
  • Basic models do not have a window inside the door, thus there are only two dedicated windows, one in front and one in back.
  • The basic models have a duffel style storage bag with a zipper. The deluxe model features a strap-and-cinch storage bag which eliminates cramming or stuffing.
  • Deluxe models have top line “Y K K” brand zippers. The basic model has the generic version.


Pretty hard to find much negative to point out about this tent.

One common (mild) complaint is that this canvas tent is heavy. But that is to be expected for a tent built to last.

The price is higher than poly tents. Yes it is, but the value-for-money is self evident.

One person complained the 8-person configuration was cramped for his family of seven. This is a common gripe for all family camping tents.

My golden rule is that if you have a family of four, you need an 8-person tent. If there are five or six of you, go for a ten or 12-person set-up.

Sure, an 8-person tent can sleep eight, but please take into account your sleeping mats and sundry equipment.

I noted a complaint about puncture marks in the floor after a tent was pitched on stones. Well, common sense should prevail here. I always recommend placing a tarpaulin under a tent floor, for added comfort and protection.

You can click here to see how cheap a waterproof poly tarp can be.


If you can afford the Kodiak Canvas Flex-Bow Deluxe Tent, I recommend you go for it. But you will not be short-changed in opting for the basic models which retain their value-for-money.

You still have quality doors and windows for airflow and temperature control. The manufacturer hastens to add that they have had very few issues with the generic zippers they use on their canvas cabin tents.


For family fun in the great outdoors, follow these camping ideas for kids

A list of camping ideas for kids to help them enjoy their first real contact with nature

The first obstacle to tackle when taking children camping for the first time, is to keep them occupied while camping ideas for kidsstill on the road.

A family camping trip often involves many hours travelling before the outdoor adventure begins.

It is difficult to keep even the most well behaved child sitting still in a confined space for long periods.

They will become restless as boredom sets in, and irritable if left to get too hungry. The crankiness will soon spread to the rest of the family, unless you take the time to plan ahead.

Image by Joe Fakih Gomez at Flickr


Tips for keeping kids happy during the journey.

Pack dedicated travel bags: Arrange a travel bag suited to each individual child. Very young children are comforted by the presence of familiar possessions. These could include a favorite stuffed animal, like a cherished teddy bear. For some children, it might be a favorite blanket. Items such as these might be all you need to stop the kids from fretting when away from familiar suroundings for the first time.

To avoid grumbling induced by empty tummies, pack snacks and drinks in spill proof containers. This will keep them content until you decide when to stop for a proper meal break.


Take some activity books: You can buy cheap portable trays, suitable for small laps, which can act as the child’s personal space. These trays can function as tables for snacking or as play stations when travelling. Bring some coloring books or writing pads for writing and drawing. Don’t forget the colored pens and pencils.

All these items are pretty cheap to buy. In fact buying them for the trip is better than bringing them from home. The kids will be excited to receive these new items and eager to make use of them.


Buy toys and games designed for travelling: It’s much easier to avoid crying or nagging by making it harder for the kids to drop items on the car floor. They are hard to retrieve in a packed vehicle while on the road.There are many specialised travel toys and activity aids available for travelling. Drawing books might have pencils attached on a string, while games and puzzles come with magnetic pieces.

By ensuring your kids have their things within reach, they are often kept amused for extended periods, and wont be asking “are we there yet?” more than at tolerable levels.

See the convenience of a simple, cheap, car back seat organizer. To check one out, just click here.


Take some cheap cameras: Kids love to take pictures and there are a variety of disposable or inexpensive digital cameras on the market. Keep it simple, so that breakage or accidental drink spills don’t become an issue. Encourage them to take pictures of anything new they see in nature. They can start during breaks in the car journey. Once you have arrived at your family camping destination, let the kids show you their results.


Pack some electronic entertainment: No need to rough it on your first family camping venture. Both older and the very young children are accustomed to electronics these days. So pack the portable DVD player by all means (remember to include headphones for your own peace and quiet). Music players and handheld gaming systems also provide great entertainment. They don’t take up much room either.

If you decide on the electronics, a big mistake would be to forget to include extra batteries or car chargers.


Keeping children happy while travelling is not difficult, as long as you take a little time to plan ahead. Kids love to be active, so don’t be tempted to make an express trip right to the campsite. Take the time to visit scenic sites on the way and take some pictures with those cameras. There are often roadside signs pointing to memorials or scenic photo opportunities.

Frequent stops can pay didvidends for adults. Think a little from your child’s perspective. Stopping at interesting spots along the road breaks the monotony of travel by car. Each stop could provide the opportunity to learn something new and give you something to discuss with the kids.


Don’t forget the family dog: Kids love to have their pets along, and the dogs want to be part of any family action. Get some advice on taking your dog camping at www.tentreviewshq.org/camping-with-dogs.


Some kids camping tips once the tent is set up.

Try some practice camping: It makes sense to set up your new family camping tent in the backyard. That way you know that all the components are present. Modern tents are designed for easy set up. But if you are new to camping, it pays to be familiar with the process to avoid fumbling about at the campsite.

Let the older kids camp out in the yard with you overnight to get familiar with sleeping outdoors. Encourage them to help out with setting up and dismantling the tent.

I would encourage toddlers to enjoy their first kids camping experience with an indoors practice run. Set up camp in a camping ideas for kidssuitable room. You could use some clothes pegs, string and old sheets or blankets draped over a table. They will think it is great fun. A lot of kids will want to sleep over in their home-built camps. It givesthem an idea what a camping trip is all about, and lessens the fear of being outdoors overnight for the first time.

To find some cute pop up tents to buy for that practice run at camping,  just click here.


Comfortable camping for kids: The first night at a camping site is a big step up from Indoor camping or a night in the backyard. Lack of preparation can turn the initial experience into a disaster.

Image by Lars Ploughman at Flickr


Assuming you have followed all guidelines on setting up camp, allowing for suitable bedding in keeping with the prevailing weather, is the key to family harmony. No matter how pleasant the day temperature, night’s can be uncomfortably chilly for the very young.


Don’t scrimp on children’s sleeping bags: They might be cheap and look colorful, decorated with cartoon characters, but they are best suited for indoor sleepovers. Quality sleeping bags will have a form of temperature rating. Check the label and read reviews.


Some good advice for the young and old is to wear something on your head when in your sleeping bag at night. This helps greatly to avoid body heat loss. Discourage kids from putting their heads down in the bag because the resultant condensation could create dampness and discomfort.

Having an extra barrier between the sleeping bag and the tent floor is well advised. There is a big range of sleeping support available to enhance everyone’s comfort. If sharing sleeping space with an infant, an air mattress would be a good choice. Foam pads are suitable for most other situations.


Nights also can be hot: Ensure that you are fully aware of your tent’s allowance for ventilation. See that the vents are left open on warm nights. Leave sufficient vents open even on cooler nights to avoid condensation building up on the tent roof and walls and cause annoying water droplets.

Make sure to use your tent’s rain fly, even in clear weather. A dewy night or fog can also contribute to water dripping inside.

Allowing for a suitable sized family camping tent is a must to ensure your comfort. Always choose one that is larger than the one supposedly suitable for the number in your group.


Clean kids sleep better: If showers or faucets are not handy at your campsite, ensure that a pot of boiled water is at hand to wipe down grubby faces and sweaty feet. You could bring your own water for safe drinking.


Scary night sounds: Once the lights are out and chatter has ceased, kids could become frightened by sounds in the dark. Remember, an owl sounds like a type of bird to adults, but could represent something sinister to the young imagination. It could be worthwhile investing in some simple earplugs.

Having a reliable torch or headlamp close by will bring quick relief to a frightened youngster.


Bring appropriate clothing and footwear: For hot weather dress kids in loose-fitting cotton clothing. Long sleeves and long pants provide extra protection from the sun. It will also help to keep insect bites and brushes with irritating plants to a minimum.

Autumn is arguably the ideal season for camping with kids. But you will need to have suitable clothing to rug up the kids during a cold snap and light drizzle. Fleece-lined jackets are suitable to maintain body heat and keep dry. Wool socks will ensure warm feet and happy children.

I would not recommend winter  for a child’s first camping trip. However, if winter is the only time of year available to you, then extra care is needed when organising appropriate clothing.

Thermal underwear is a must to wear under waterproof pants, such as those designed for skiing. Hooded jackets, gloves and scarves complete the picture.


Camping ideas for kids when caught out by bad weather


It pays to be prepared when the weather forecaster gets it wrong. You might be caught unprepared for wet weather, even if you are camping in the hotter months.


Pack a poncho: Buy a handful of those handy disposable ponchos so you can still move about the camping ground if camping ideas for kidsnecessary. They are very cheap and take up little room.


Bring some cards: All those toys, electronic devices and coloring books which kept the kids amused during the drive will again come in handy if tent-bound by the weather.

But these amusements for the little ones can be augmented by things like decks of playing cards. But not just the regular kind. There are all sorts of card games available and kids love them, especially if the adults join in.

Image by David Shankbone at Flickr


Family games: Board games are an excellent form of entertainment for the whole family. You don’t even need batteries. You’re bound to have board games stashed away somewhere at home which you can take along camping.These games encourage interaction and assist with bonding among family and friends. It’s a great way to reconnect.


Story books: Despite all the online and other technical distractions, most young kids still love to read, or listen to stories. Bring a collection of books suitable to the age group.

If stuck in the tent, keep the youngsters entertained with some gripping yarns. Back around the campfire, try a scary ghost story to get them to huddle in close. Maybe finish the night with a lighter yarn, something funny, or an adventure story.


Why camping for kids is a valuable experience


This long list of camping ideas for kidsmight seem like it is just too much bother to take the youngsters camping. But

camping ideas for kids

camping fosters a love of nature

it will be well worth the effort.

Kids will remember these early adventures in family camping for the rest of their lives. The effect on family unity will prove invaluable

That first real venture into the outdoors will foster a love and understanding of nature. Just be sure to encourage the kids to appreciate the surrounding trees, streams and animals around the campsite.

Take them for small hikes and let them handle things like pine cones, leaves, flowers and the like. All under supervision of course.

All this will give them a different perspective on the material things in life. Enjoyment of life wont depend on being online or parked in front of the television.

You don’t need to turn them into rabid conservationists, but hopefully you will encourage your children to better understand why we need to treasure and conserve our dwindling wilderness.

At the very least, camping grounds are like little communities where the kids can learn to interact with other children and communicate in the old fashioned way. They could make new lifelong friends in the process.

For tips on how to go camping with the very young, click on the link and get advice about camping with toddlers or babies.

These camping ideas for kids are only some hints to get started. Feel free to add to the list and enjoy the great outdoors with your family.

Thanks to Flickr for the forest image